Wednesday, December 12, 2012
Garmin BirdsEye Satellite Imagery Card
With Garmin’s new BirdsEye Satellite Imagery, you can transfer an unlimited amount of satellite and aerial images to your Garmin handheld unit through a high speed internet connection. Having the ability layer Garmin Vector maps such as TOPO 100K, TOPO 24K, BlueChart, or Inland Lakes, will provide you with real life views of roads, buildings, terrain, and shorelines. These great features make it easy for hunters who want to pre-plan hunting trips, set up stands, and mark where you find the most game to hunt.
For hikers, the BirdsEye Satellite Imagery is excellent for you to view clearings for camping areas, find and mark certain trails, and mark favorite locations you like to rest at. For our geocachers, you can determine close areas near your geocache to park at, and view the terrain around the specific geocache you’re trying to locate. No matter what your application is for your handheld unit, let the BirdsEye Satellite Imagery help enhance your next outdoor trip.
The Birdseye subscription is compatible with the Garmin GPSMAP 62, GPSMAP 78, Colorado, Montana, Dakota and Oregon series handheld GPS units only.
Subscription length is 1 year from activation date and may only be used with 1 device. Additional subscriptions are required for additional devices.
Continue read[...]
Garmin ANT+ Adapter for iPhone and iPod Touch
 This handy adapter lets you use ANT+ sensors and accessories – like the heart rate monitor, foot pod, and speed/cadence sensor – with the Garmin Fit iPhone app. Just go to the app store and download the Garmin Fit App and plug the adapter in and you are ready to track your workout right on your iPhone and iPod touch.
Garmin GTM 60 HD Digital Traffic Receiver
The Garmin GTM60 HD Digital Traffic Receiver provides 3D digital traffic information to your compatible Garmin GPS device. The HD Digital traffic receiver provides more coverage in more areas than previous models. By updating up to 10 times faster than traditional models you will stay aware of traffic from accidents, construction or other obstacles.
The GTM-60 is also 12v power adapter that powers your GPS unit and all with no subscription fees and no on-screen advertising. Garmin Nuvi 24x5, 25x5, and 3400 series units
Continue read[...]
The GTM-60 is also 12v power adapter that powers your GPS unit and all with no subscription fees and no on-screen advertising. Garmin Nuvi 24x5, 25x5, and 3400 series units
1990 Nissan 240SX Alternators & Regulators - Hitachi
Hitachi alternators are conventional 3-phase, self-rectifying
alternators. See Fig. 3. Three positive and 3 negative diodes are used
to rectify current. All models are equipped with Integrated Circuit
(IC) voltage regulators.
A diode on the charge indicator light circuit monitors
alternating voltage at the stator. Charge indicator light remains off
when monitored voltage and charging voltage are equal.
download here
Continue read[...]
download here
Hitachi 60 Amp alternator for Yanmar 3GM
"tee" meaning three 1/4" fast-on spade type blades, arranged in a "T" in a circular plug?
That would be a standard automobile configuration, the three leads going to the ignition to turn the alternator on/off and connect to the warning light.
download here
Continue read[...]
That would be a standard automobile configuration, the three leads going to the ignition to turn the alternator on/off and connect to the warning light.
download here
Hitachi 55 amp alternator
So where does the voltage sense wire from the alternator connect to the system. After 10 years, there is probably some corrosion on the connections and terminals which could effect the voltage both at the sense connection and on the high amp wiring.
Also, what was the SOC of the batteries. Alternator output is based on SOC of the batteries. If the batteries were mostly charged then I would expect about 35 amps out of the alternator. The Amp output of the alternator is not constant and is reduced as SOC and internal battery resistance rises. The alternator will only put out what the batteries and system will accept.
In the 80's and 90's, the thought was to install a 100 amp or larger alternator. Mainly to reduce engine run times while charging at anchor. Now a days with solar and wind being the primary means of charging, I really don't see why people are still spending big money on high output alternators.
Really its a bit outdated to put a 100-200 amp alternator on a boat when at anchor the power is coming from solar and wind (or a honda generator). I find that when I motor its for hours at a time, so the 55 amp hatachi works very well without excess side loading on the water pump bearings or larger belts.
Continue read[...]
Also, what was the SOC of the batteries. Alternator output is based on SOC of the batteries. If the batteries were mostly charged then I would expect about 35 amps out of the alternator. The Amp output of the alternator is not constant and is reduced as SOC and internal battery resistance rises. The alternator will only put out what the batteries and system will accept.
In the 80's and 90's, the thought was to install a 100 amp or larger alternator. Mainly to reduce engine run times while charging at anchor. Now a days with solar and wind being the primary means of charging, I really don't see why people are still spending big money on high output alternators.
Really its a bit outdated to put a 100-200 amp alternator on a boat when at anchor the power is coming from solar and wind (or a honda generator). I find that when I motor its for hours at a time, so the 55 amp hatachi works very well without excess side loading on the water pump bearings or larger belts.
Friday, November 30, 2012
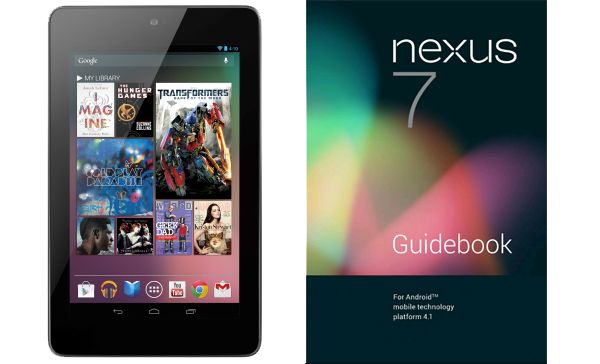
Google Nexus 7 Manual
Google Nexus 7 Manual: Download Asus Nexus Tablet User Guide - How To Turn on & sign in ? To turn on your Nexus 7, press the Power button on the right edge near the top for a few seconds, then release it.
The first time, you’ll see a Welcome screen.
- To choose a different language, touch the menu.
- To continue, touch Start and follow the instructions.
When prompted, sign in using the email address and password for your Google Account. If you don’t have one yet, go ahead and create one. An email address that you use for any of the following counts as a Google Account:
- Gmail
- YouTube
- Google Apps
- AdWords
- Any other Google product
When you sign in with a Google Account, all the email, contacts, Calendar events, and other data associated with that account are automatically synced with your tablet. if you have multiple Google Accounts, you can add the others later.
How to Charge the battery ?
The printed Quick start Guide that comes with Nexus 7 contains basic operating instructions for your new tablet. The battery may not be fully charged at first. It’s a good idea to fully charge it as soon as you can.
Connect the micro usb cable to Nexus 7 and to the charging unit, and the charging unit to a power outlet:
IMPorTAnT: use the charging unit and micro usb cable that come with your Nexus 7. other charging units and usb cables may charge more slowly or not at all
You’re in control
When you opt in to Google Now, you’re also turning on location reporting and location history. Google Now also uses location information provided by Google’s location service and GPS, if those are currently turned on. Google’s location service must be turned on for Google Now to work. Google Now also uses data from other sources, such as your data in Google products or in third-party products that you allow Google Now to access. For example, your tablet’s synced calendar may include entries from non-Google calendar products. For example, if you have a synced calendar entry for a dentist appointment that includes the dentist’s address, Google Now can check traffic and suggest when to leave. And if you have searches stored in your Web History, Google Now can also show cards based on sports scores, flight status, and so on.You’re in control. You can choose exactly which cards you’d like to see, adjust the details of what they display, and adjust your privacy settings. For more information about Google Now and your location information, see “Chapter 4, Make search personal,” on page 26. Page 26 u can download pdf below.
Download Asus Nexus Tablet User Guide pdf
Nokia Asha 202 quick manual/user guide
Nokia Asha 202 quick manual/user guide - How to Update phone software using your PC ? Update your phone software with the Nokia Suite PC app. You can also back up the photos and other stuff in your phone to your computer. You need a compatible PC, a highspeed internet connection, and a compatible USB cable to connect your phone to the PC. To get more info and to download the app, go to www.nokia.com/support.

How to Update phone software using your phone ?
You can update your phone software wirelessly. You can also set your phone to automatically check forupdates.
You can only update your software when using the SIM in the internal SIM holder.
Select Menu > Settings and Device > Device updates.
1. To check if there is an update, select Current sw details.
2. To download and install an update, select Downl. device sw, then follow the instructions shown on the
phone.
The update may take several minutes. If you encounter problems, contact your network service provider.
Check for updates automatically ?
Select Automatic SW update, then set how often to check. Your network service provider may send updates over the air directly to your phone. For more info on this network service, contact your network service provider.
Back up content to a memory card ?
Want to make sure you won't lose any important files? You can back up your phone memory to a compatible memory card.
1. Select Menu > Settings > Sync & backup.
2. Select Create backup.
3. Select what you want to back up, then select Done.
Restore a backup
Select Restore backup
And now you can download user manual below, if you can read to full content.
Download Nokia Asha 202 User Manual Guide(pdf)
Nokia Asha 306 quick manual/user guide
Nokia Asha 306 quick manual/user guide - How Charge the battery over USB ? Battery low, but you don't have a charger with you? You can use a compatible USB cable to connect to a compatible device, such as a computer. To avoid breaking the charger connector, be careful when connecting or disconnecting the charger cable.

Learn how to start using your phone.
Keys and parts
1 — Earpiece
2 — Screen
3 — Call key
4 — Microphone
5 — Charger connector
6 — Micro-USB connector
7 — Headset connector (Nokia AV connector 3.5 mm)
8 — Volume up/Zoom in key
9 — Volume down/Zoom out key
10 — Lock key
11 — End/Power key
12 — Camera lens. Before using the camera, remove the protective tape from the lens.
13 — Memory card slot
14 — Loudspeaker

Insert or remove a memory card
Use only compatible microSD cards approved by Nokia for use with this device. Incompatible cards may damage the card and the device and corrupt data stored on the card.
Your phone supports memory cards with a capacity of up to 32 GB. You can insert or remove the memory card without switching the phone off.
Insert a memory card :
1 Use your fingernail to open the cover of the memory card slot.
2 Push the memory card in with the contact area face up until it locks into place.
3 Close the cover of the memory card slot.
Remove the memory card :
Important: Do not remove the memory card when an app is using it. Doing so may damage the memory card and the device and corrupt data stored on the card.
1 Open the memory card slot cover.
2 Push the card in until it's free, then pull it out.
3 Close the cover
Charge the battery :
Your battery has been partially charged at the factory, but you may need to recharge it before you can witch on your phone for the first time. If the phone indicates a low charge, do the following:
1 Connect the charger to a wall outlet.
2 Connect the charger to the phone.
3 When the phone indicates a full charge, disconnect the charger from the phone, then from the wall outlet.
You do not need to charge the battery for a specific length of time, and you can use the phone while it is Charging. If the battery is completely discharged, it may take several minutes before the charging indicator is displayed or before any calls can be made.
If the battery has not been used for a long time, to begin charging, you may need to connect the charger, then unplug and reconnect it.
Ok there, if you read full this content manual user, you can download it below.
Download Nokia Asha 306 quick manual/user guide (pdf)
Acer Iconia Tab A110 quick manual/user guide
Acer Iconia Tab A110 quick manual/user guide - How to Sign in to or create a Google account ? If you have Internet access, your tablet allows you to synchronize information with a Google account. During the start-up process, you may create or sign in to an account, which will be used to synchronize your contact list, email, calendar and other information. If you do not yet have Internet access, or do not want to use this feature, then tap Skip.
Important: You must sign in to a Google Account to use Gmail, Google Talk, Google Calendar, and other Google Apps; to download applications from Google Play; to back up your settings to Google servers; and to take advantage of other Google services on your tablet.
If you want to restore existing settings from another device with Android 2.0 (or later) installed, you must sign in to your Google account during setup. If you wait until after setup is complete, your settings will not be restored.
Note: If you have multiple Google accounts, such as separate accounts for personal and business contacts, you can access and synchonize them from the Accounts settings section. See "Multiple Google accounts" on page 40.

Getting to know your tablet
Features and functions
Your new tablet offers leading, easy-to-access multimedia and entertainment features. You can:
- Connect to the Internet.
- Access your email while on the move.
- Keep in touch with your friends via your People and social networking applications.
Product registration
When using your product for the first time, it is recommended that you immediately register it. This will give you access to useful benefits, such as:
- Faster service from our trained representatives.
- Membership in the Acer community: receive promotions and participate in customer surveys.
- The latest news from Acer.
Hurry and register, as other advantages await you!
How to register
To register your Acer product, please visit www.acer.com. Click Registration and follow the simple instructions.
You can also register directly from your tablet by tapping the Registration icon. After we receive your roduct registration, you will be sent a confirmation email with important data that you should keep in a safe place.
To turn on your tablet, press and hold the power button until the tablet vibrates. Wait a moment for your tablet to bootup. You will then be asked some questions before you can use your tablet.
To start, tap to select your language and country, then tap Start. Follow the rest of the instructions as they are displayed
Note: If the tablet’s screen turns off, it has entered sleep mode. Briefly press the power button to wake it up. For more information, see "Waking your tablet" on page 19
Ok, If you to read full content, you can download user manual pdf below.
Download Acer Iconia Tab A110 quick manual/user guide (pdf)
Nokia Lumia 510 quick manual/user guide
Nokia Lumia 510 quick manual/user guide - How to Insert the SIM card ? Important: This device is designed to be used with a mini-UICC SIM card, also known as a micro-SIM card only. A micro-SIM card is smaller than the standard SIM card. Use of incompatible SIM cards may damage the card or the device, and may
corrupt data stored on the card. Do not use SIM cards that have been modified to fit the micro-SIM slot. To replace a standard SIM card with a micro-SIM card, contact your service provider. Do not attach any stickers to the card.
Insert the SIM card :
1. Place your fingernail in the gap on the lower right edge of the phone, and carefully
lift and remove the back cover
2. If the battery is inserted, lift it out.
3. Make sure the contact area is facing down, and insert the card.
4. Line up the battery contacts, and insert the battery.
5. Replace the back cover.

Learn how to start using your phone.
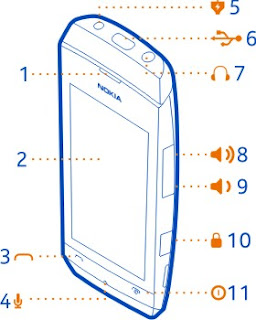
Keys and parts
1 — Connector for headphones and loudspeakers (3.5 mm)
2 — Earpiece
3 — Proximity sensor. Do not cover, for example, with protective film or tape.
4 — Volume key
5 — Power/Lock key
6 — Camera key
7 — Microphone
8 — Back key
9 — Start key
10 — Search key
11 — Micro-USB connector. Used also to charge the battery.
12 — Camera lens
13 — Loudspeaker

Also can too using USB charging when a wall outlet is not available. Data can be transferred while charging the device. The efficiency of USB charging power varies significantly, and it may take a long time for charging to start and the device to start functioning.
1. First connect the USB cable to the computer, then to your phone.
2. When the battery is full, first unplug the USB cable from your phone, then from the computer.
If the battery is completely discharged, it may take several minutes before the charging indicator is displayed or before any calls can be made.
If you to read full, you can download user manual below.
Download Nokia Lumia 510 quick manual/user guide (Pdf)
Thursday, November 29, 2012
LG Nexus 4 quick manual/user guide
LG Nexus 4 quick manual/user guide - Insert a SIM card >> Before you start using your phone, you may need to insert your Micro SIM card. If no card is installed, the message “No SIM card” ap pears on the phone’s lock screen
The SIM card tray is located on the left side of the phone below the volume button. The eject button is a small hole just above the tray door. To install a new Micro SIM card:
1. Insert the SIM ejection tool that comes with the phone (or a thin pin) into the eject button hole, and push firmly but gently until the tray pops out.
2. Remove the tray and place the micro SIM card inside it, with the contacts out and the angled corner to the right. There is only one possible way to fit the card snugly into the tray.
3. Carefully reposition the tray in the slot and push it gently back into the phone.
TIP: Your phone’s IMEI identification number is on the SIM card tray. You may need this number later to identify your phone for service purposes. Write down the IMEI number or take a photo of the label on the product box

Table of contents
- Get started
- Explore your phone
- Use the Phone app
- Use the keyboard
- Try some apps
- Use Google Now & Search
- Accessibility
- Wireless & network settings
- Device settings
- Security settings
- Personal, account, & system settings
- Appendix: Hardware reference
Set up your phone
The first time you turn on the phone, you’ll see a Welcome screen.
- To choose a different language, touch the menu.
- To continue, touch Start and follow the instructions.
When prompted, sign in using the email address and password for your Google Account. If you don’t have one yet, create one.
An email address that you use for any of the following counts as a Google Account:
- Gmail
- YouTube
- Google Apps
- AdWords
- Any other Google product
When you sign in with a Google Account, all the email, contacts, Calendar events, and other data associated with that account are automatically synced with your phone. If you have multiple Google Accounts, you can add the others later.
Ok, If you want to read full LG Nexus 4 quick manual/user guide, you can download below.
[Download LG Nexus 4 quick manual/user guide Pdf]
Samsung Google Nexus 10 quick manual/user guide
Samsung Google Nexus 10 quick manual/user guide - Samsung Google Nexus OS 10 comes using the latest Android 4.2 Jelly Bean. Google Nexus 10 has a touch screen measuring 10.1 inches with a very high resolution of 2560 x 1600 pixels (300ppi) resolution Retina screen beats Apple's new iPad that only has a resolution of 2048 x 1536 (264ppi).
Samsung Google Nexus 10 is manufactured by Samsung, and is powered by the Samsung Exynos chip 5 with a dual core 1.7GHz processor and 2GB of RAM. Nexus 10 is also equipped with a 5 megapixel main camera, 1.9 megapixel front camera, Wi-Fi, NFC and 9000mAh capacity battery.
Google Nexus 10 will be available in two versions namely 16GB and 32GB.

Google, Android, Gmail, Google Maps, Chrome, Nexus 10, Google Play, YouTube, Google+, and other trademarks are property of Google Inc. A list of Google trademarks is available at http://www.google.com/permissions/guidelines.html. Samsung and the Samsung logo are trademarks of Samsung. All other marks and trademarks are properties of their respective owners. The content of this guidebook may differ in some details from the product or its software. For best results, make sure you’re running the latest Android system update. To check, go to Settings > System > About tablet > System updates. All information in this guidebook is subject to change without notice.. For online help and support, visit support.google.com/nexus.
Why use a Google Account?
A Google Account lets you organize and access your personal information from any computer or mobile device:
1.Use Google Play. Google Play brings together all your favorite content in one place: movies, TV shows, books, music, magazines, apps, and more. When you sign in with your Google Account, you can reach any of this content from any of your devices – as long as you have a network connection. You can also shop for more in the Google Play store.
2.Synchronize and back up everything. Whether you draft an email, add an event to your calendar, or add a friend’s address, your work gets backed up continuously by Google and synchronized with any computer where you use the same Google Account.
3.Access from anywhere. Check your latest calendar, email, text messages, or social stream, no matter what computer or mobile device you’re using.
4.Keep your stuff secure and available. Google works round the clock to protect your personal data from unauthorized access and to ensure that you get it when you need it, wherever you need it.
5.Simplify shopping. You can connect your Google account with Google Wallet, which makes it easy to purchase music, books, apps, and more on Google Play and other online stores.
6.Use other Google services. Your Google Account also lets you take full advantage of other Google apps and services that you may want to use, such as Gmail, Google Maps, Navigation, Google Play, YouTube, Google Talk, Messaging, and more.
Use & customize the lock screen
You can add widgets to the top of the lock screen and swipe between them. Lock screen widgets let you scan recent Gmail messages, Calendar entries, and other app content without unlocking your screen.
To set or change the type of lock, see Set screen lock.
Add a widget to the lock screen
1. In portrait mode, swipe right across the upper part of the screen until you see the Plus icon. In landscape mode, swipe right from the left side of your screen
2. Touch the Plus icon. If prompted, enter your PIN, pattern, or password. A set of the available widgets appears. Apps that support lock screen widgets can add their own widgets to this set.
3. Touch the widget you want to add. You can add up to five widgets to your lock screen. To move between them, swipe across the top of the screen in portrait mode, or across the left side of the screen in landscape mode.
To Read Full Samsung Google Nexus 10 quick manual/user guide, you can download it below.
HTC DROID DNA quick manual/user guide
HTC DROID DNA quick manual/user guide - HTC Droid DNA is phablet Android devices launched in the U.S. exclusively through Verizon. HTC Droid DNA comes with a touch screen Super LCD3 measuring 5 inches with a resolution of 1920 x 1080piksel (441ppi) and coated with Corning Gorilla Glass 2.
HTC Droid DNA using Android OS 4.1 Jelly Bean and powered with 1.5GHz quad-core processor and Adreno 320 GPU. HTC Droid DNA has an 8 megapixel main camera and 2.1 megapixel front camera, both of which have the ability to record 1080p HD video.

IMPORTANT CUSTOMER INFORMATION
Please be advised that many services and applications offered through this unique device are provided by various device, operating system, software and application developers (e.g. Google, Motorola, Microsoft, Palm, Research In Motion). If you use, link to or download such a service, or an application such as a non-Verizon Wireless location based GPS-type service, chat room, marketplace or social network from this device, you should carefully review the terms of such service or application. If you use any of these non-Verizon Wireless services or applications, personal information you submit may be read, collected, or used by the service or application provider and/or other users of those forums. Verizon Wireless is not responsible for your use of those applications or information you choose to submit or share with others. Specific terms and conditions, terms of use, and privacy policies apply to those applications and services. Please review carefully any and all terms and conditions applicable to those applications and services including those related to any location-based services for any particular privacy policies, risks or waivers. Your Verizon Wireless Customer Agreement Terms and Conditions and certain other specifically identified terms govern your use of any Verizon Wireless products and services.
Droid DNA by HTC
1. BACK
2. HOME
3. USB connector
4. RECENT APPS
5. VOLUME
6. Proximity sensor
7. Notification LED
8. Tray eject hole
9. SIM card tray
10. POWER
11. 3.5mm headset jack
12. Front camera
Checking battery history
Check how long you've been using Droid DNA by HTC since the last charge. You can also see a chart that shows how long the screen has been on, and how long you've been using connections like the mobile network or Wi-Fi.
1. Slide the Notifications panel open, and then tap .
2. Tap Battery > History.
3. If you've used Droid DNA by HTC for a long time since the last charge, swipe left or right to scale the graph that details battery usage over time.
You can also spread your fingers or pinch to scale the graph.
Ok, So if you to read must complete, you can download this user manual below.
Download Getting Quick Start Getting
Samsung Galaxy Note II (2) User Manual
Samsung Galaxy Note II (2) quick manual/user guide GT N7100 Troubleshooting - Available features and additional services may vary by device, software, or service provider. Applications and their functions may vary by country, region, or hardware specifications. Samsung is not liable for performance issues caused by applications from any provider other than Samsung.
Samsung is not liable for performance issues or incompatibilities caused by edited registry settings or modified operating system software. Attempting to customise the operating system may cause the device or applications to work improperly.
This device provides high quality mobile communication and entertainment using Samsung’s high standards and technological expertise. This user manual is specially designed to detail the device’s functions and features. Please read this manual before using the device to ensure safe and proper use. Descriptions are based on the device’s default settings. Images and screenshots may differ in appearance from the actual product.
This device provides high quality mobile communication and entertainment using Samsung’s high standards and technological expertise. This user manual is specially designed to detail the device’s functions and features. Please read this manual before using the device to ensure safe and proper use. Descriptions are based on the device’s default settings. Images and screenshots may differ in appearance from the actual product.
Content may differ from the final product, or from software provided by service providers or carriers, and is subject to change without prior notice. For the latest version of the manual, refer to the Samsung website, www.samsung.com.

Software, sound sources, wallpapers, images, and other media provided with this device are licensed for limited use. Extracting and using these materials for commercial or other purposes is an infringement of copyright laws. Users are entirely responsible for illegal use of media.
You may incur additional charges for data services, such as messaging, uploading and downloading, auto-syncing, or using location services. To avoid additional charges, select an appropriate data tariff plan. For details, contact your service provider.
Default applications that come with the device are subject to updates and may no longer be supported without prior notice. If you have questions about an application provided with the device, contact a Samsung Service Centre. For user-installed applications, contact service providers.
Modifying the device’s operating system or installing softwares from unofficial sources may result in device malfunctions and data corruption or loss. These actions are violations of your Samsung licence agreement and will void your warranty.
For More Information, You Can Download This User Manual, Read This anda Enjoy!
And we provide three User Manual for this Note 2 N7100: English, German, and Spanish.
Download User Manual of Samsung Galaxy Note II GT-N7100 | Language: English | Page: 140 | PDF Size: 8.39MB
Download User Manual of Samsung Galaxy Note II GT-N7100 | Language: German | Page: 140 | PDF Size: 27.82MB
Download User Manual of Samsung Galaxy Note II GT-N7100 | Language: Spanish | Page: 140 | PDF Size: 26.38MB
Vodafone Smart Tab II 7 quick manual/user guide
Vodafone Smart Tab II 7 quick manual/user guide - Your Vodafone Smart Tab II provides a full internet experience on the go, as well as delivering excellent performance for media and gaming. Your connectivity, data and messaging needs are fully supported via the Vodafone network or via Wi-Fi, allowing you to communicate anytime and anywhere.
Some of the many functions of your new Smart Tab II include:
- Android 4.0 (Ice Cream Sandwhich)
- 7” WSVGA touch display (1024x600)
- MediaTek 1GHz Processor
- GSM/GPRS/EDGE: Tri-band (900,1800 and 1900MHz); 3G/UMTS/HSPA: Dual band (900 and 2100MHz); Wi-Fi (b/g/n)/BT
- 2.0 megapixel back and 0.3 megapixel front camera
- 1GB RAM and 4GB internal storage
- Vodafone DLNA enabled Media Manager
For this product’s user manual and additional supporting software, please visit
the website below:
http://www.vodafone.com/smarttab2

Read me first
- To guarantee the Vodafone Smart Tab II is always in its best condition, please read this manual carefully and keep it for future use.
- The pictures, symbols and contents in this manual are just for your reference. They may be not completely identical with your Vodafone Smart Tab II, so please refer to the real object.
What’s in the box?
Check your device box for the following items:
- Vodafone Smart Tab II 7 tablet
- Data cable
- USB power adapter
- Quick Start Guide
Tips:
The items supplied with your device may vary depending on the software and accessories available in your region or offered by your service provider. You can obtain additional accessories, such as Smart covers, from your local Vodafone dealer.
How to open the notifications and quick settings panel ?
System messages, if any, will be displayed on the bottom right corner of the display. Information about Wi-Fi connection and reception, power levels, charging status, and other notifications are displayed in the status bar. Tap the status bar to display the notification panel. Tap to open the setting details window which ontains the Airplane mode switch, Wi-Fi setting shortcut, Auto-rotate screen switch, Brightness adjustment toolbar, Notifications switch and Settings shortcut.
The SIM card slot is located on the bottom left side of the Smart Tab II. To insert a SIM card while turned off, pull up the SIM card slot cover with a fingertip, then insert the SIM card. To remove the SIM card while turned off, push the card into the slot lightly until it pops out. Do NOT insert or remove the SIM card while your Smart Tab II is turned on. Doing so may permanently damage your SIM card or Smart Tab II.
Powering on/off your Smart Tab II
Press and hold the Power button on your Smart Tab II for about 4 seconds, then release it. The Vodafone logo and the startup screen will appear in sequence, indicating your Smart Tab II has been turned on. Press and hold the Power button on your Smart Tab II for about 1 second. The Power off pop-up window will appear. Tap OK to turn off your Smart Tab II.
Switching Your Smart Tab II to Sleep Mode
If you do not need to use your Smart Tab II temporarily, you can press the Power button to deactivate the display. Your Smart Tab II will then enter Standby mode to save power.
Waking Up Your Smart Tab II from Sleep Mode
With the display deactivated, press the Power button on the Smart Tab II to activate the display. The Smart Tab II’s display will then illuminate, indicating that it has been activated.
Ok, So if you to read to complete, Please download user manual below.
LG Optimus Vu II quick manual/user guide
LG Optimus Vu II quick manual/user guide - LG Optimus Vu II is based on the Android 4.0 Ice Cream Sandwich which comes with a touch screen measuring 5 inches with a resolution of 768 x 1024 pixels (256ppi). LG Optimus Vu II is powered by 1.5GHz Snapdragon dual-core processor and GPU Adreno 225 Krait.
LG Optimus Vu II is also equipped with 2GB of RAM, an 8 megapixel camera, 1.3 megapixel front camera, Wi-Fi a / b / g / n with Wi-Fi hotspot and DLNA, Bluetooth 4.0, NFC, GPS, and a 2150mAh capacity battery.

LG Optimus Vu II will be available in South Korea for 966,900 KRW (about $ 866), and the LG Optimus Elite user manual / now available for download at the official website of LG. Users can now take advantage of this guide to enjoy all the functions, features and Apps from the LG Optimus Vu II.
Documents arrive in Korea as a 35MB download, offers a good insight into all the specifications and tips and tricks of the LG Optimus Vu II.
LG Optimus Vu II User Guide / Manual Download:
https://www.box.com/s/ko2518hhc10j3tj1fs12
LG Optimus Vu quick manual/user guide
LG Optimus Vu quick manual/user guide - If you lose the LG Optimus Vu User Manual, do not worry about it, for you are now here! I have seen many others having the same problem, so I share the User Manual below. This guide is available in PDF format and require Adobe Acrobat Reader. So make sure you have installed Adobe Acrobat Reader on your PC. If not, please Google it, you will find what you want there. http://get.adobe.com/reader. if it is installed, download the pdf below.

https://www.box.com/s/17cdd03a532d41f895ec
Nokia Asha 308 Dual SIM quick manual/user guide
Nokia Asha 308 Dual SIM quick manual/user guide - Nokia Asha 308 is the latest mobile phone series Asha Touch that comes with two SIM card slots GSM + GSM (Easy Swap). Nokia Asha 308 has a capacitive touch screen measuring 3 inches with a resolution of 240 x 400 pixels (155ppi). Smartften Xstream EVDO
Nokia Asha 308 comes with a 2 megapixel camera, FM radio, music & video player, Bluetooth, Accelerometer, GPRS / EDGE, Java, microSD slot up to 32GB, and battery capacity of 1110mAh.

Easily get your contacts, calendar, and other stuff to your new phone.
1. Switch Bluetooth on in both phones.
2. On your new phone, select settings and sync & backup > phone switch.
3. Select copy to this and what you want to copy, then select .
4. Select your old phone from the list of found devices.
5. Follow the instructions shown on both phones.
Add a shortcut to My screen:
Want to open your favourite apps straight from My screen? Add
shortcuts to your most used features.
1. Tap and hold My screen, and select shortcut.
2. Select an item, such as a widget or action, and select .
Remove a shortcut
Tap and hold My screen, and select on the shortcut you want to
remove.
Tip: Try tapping different areas on My screen. You can, for example,
change the date and time, set alarms, or add to your calendar also
from My screen.
Set a song as your ringtone
Want to use your favourite song from the music player as your
ringtone? You can also take the best section of the song and use that
as your ringtone.
1. Select settings > tone profiles and a profile.
2. When setting a ringtone for the profile, select open files, and browse to the song.
3. When asked if you want to adjust the start and end points of the tone, select YES.
4. Drag the start marker to the start point.
5. Drag the end marker to the end point.
When a marker is moved to a new point, the selection plays.
6. To manually play the selection, select .
7. Select and The edited ringtone does not replace the original ringtone or sound
clip. Preset ringtones cannot be modified, and not all formats of
ringtones are supported.
And More Tips anda Trobleshooting , you can download below. and Get the user guide in PDF format:
Download Nokia Asha 308 User Guide 2.26 MB
Motorola RAZR i User Manual, XT890 Getting Started Guide
Motorola RAZR i User Manual, XT890 Getting Started Guide - If you had experienced that the phone is getting slower and slower and finally stop responding (unresponsive to touches and key presses), the first step you must do is by restarting the phone (you can also called forced reboot). To do this reboot just press and hold both Power button and Volume down button for about 15 seconds. If this still frequently happen, you can try to find the “high usage” memory’s used by applications and the remove/ uninstall those applications. Go to settings > Applications > Running.

But if you want to make it just like the first time your experienced with your phone (factory default settings) you can do factory data reset action: Hard / Master reset. To do this just go to Apps > Settings > Privacy > Factory data reset > Reset phone.
Motorola RAZR i which is also known by its series XT890 comes with large 4.3 inches touchscreen display (measured diagonally). The touchscreen uses Super AMOLED Advanced capacitive touchscreen display with 540 x 960 pixels resolution. It’s protected by Coring Gorilla Glass along side with the splash resistant body design for strong durability performance. One important thing, the phone works under GSM data networks technology (3G HSDPA supports) and it uses micro SIM for its provider SIM card.
Quick start: Control & customise
Take control of your phone:
• Touch: it’s all in the touch. Simple gestures and touch
keys to move about.
• Speak: tell your phone what you want—touch
Apps> Voice commands.
• Customise: change notifications or display
settings—flick the status bar down and touch
Cool down
In very limited circumstances, such as where your phone has been exposed to extreme heat, you may see "Cool down" messages. To avoid possible damage to your battery and phone, you should follow these instructions until the phone is within its recommended temperature range. When your phone is in "Cool down" mode, only emergency calls can be made.
For the User Guide, just follow the links below:
Download User Guide of Motorola RAZR i | Language: English | PDF Size: 6MB | Page: 72
Download Getting Started Guide of Motorola RAZR i | Language: English | PDF Size: 3.83MB | Page: 2
Wednesday, November 28, 2012
Motorola Defy Mini XT321 & XT320 QSG User Manual
Motorola Defy Mini XT321 & XT320 QSG quick manual/user guide - Your MOTOROLA DEFY™ MINI stands up to water, dust and life. Now your investment is safe and protected from life's little challenges, like that sudden rain shower and other everyday mishaps.
Of course, your phone isn't indestructible, so to avoid damage from natural elements, such as water, sand and dust intrusion, always make sure that the battery door cover and connector covers are closed and secure.

If your phone gets wet and/or dirty:
Wipe with a soft cloth and shake to remove excesswater from the entire phone, especially the displayscreen, speaker and microphone ports.
Allow your phone to air-dry for at least 1 hour beforeusing it again.
Always make sure you clean all dirt and debris fromthe battery door cover/seals and connector covers.
Note: Your phone is not designed to float or work underwater.
"Cool down" messages. To avoid possible damage to your battery and phone, you should follow these
instructions until the phone is within its recommended temperature range. When your phone is in "Cool down" mode, only emergency calls can be made.
Emergency calls
Note: Your service provider programs one or more emergency phone numbers that you can call under any
circumstances, even when your phone is locked. Emergency numbers vary by country. Your pre-programmed emergency number(s) may not work in all locations and sometimes an emergency call cannot
be placed due to network, environmental or interference issues.
1 Touch (if your phone is locked, then
touch Emergency call).
2 Enter the emergency number.
3 Touch Call to call the emergency number.
Note: Your phone can use location based services (GPS and AGPS) to help the emergency services find you. See "Location services" in your legal and safety information.
You can read more to be to download. For the download links, you can get by clicking the links below:
Download User Guide of Motorola Defy mini XT320/XT321 | Language: English | Page: 48 | PDF Size: 8.63MB
Download Getting Started Guide (GSG/QSG) of Motorola Defy mini XT320/XT321 | Language: English | Page: 70 | PDF Size: 17.01MB
Sony Xperia J ST26i/ ST26a Manual User Guide
Sony Xperia J ST26i/ ST26a Manual User Guide - Please read the Important information leaflet before you use your mobile phone. Some of the services and features described in this User guide are not supported in all countries/regions or by all networks and/or service providers in all areas. Without limitation, this applies to the GSM International Emergency Number 112. Please contact your network operator or service provider to determine availability of any specific service or feature and whether additional access or usage fees apply.

- Press and hold down the power keyon the right side of the phone until the phone vibrates.
- If your screen goes dark, briefly press the power key to activate the screen.
- To unlock the screen, drag to the right across the screen.
- Enter your SIM card PIN when requested, and select OK.
- Wait a while for the phone to start.
from the Settings menu. To correct a mistake made while entering your SIM card PIN, tap .
To turn off the phone
- Press and hold down the power key
- In the options menu, tap Power off.
- Tap OK.
Setup guide
The first time you start your phone, a setup guide opens to explain basic phone functions and help you enter essential settings. This is a good time to configure the phone to your specific needs. You can also access the setup guide later from the Application screen.
To access the setup guide manually
- From the Home screen, tap .
- Find and tap Setup guide.
Download User Guide of Xperia J ST26i/ST26a | Language: English | Page: 132 | PDF Size: 9.01MB
Download User Guide of Xperia J ST26i/ST26a | Language: Spanish | Page: 138 | PDF Size: 8.83MB
Download User Guide of Xperia J ST26i/ST26a | Language: Germany | Page: 143 | PDF Size: 8.84MB
Sony Xperia TX LT29i Manual User Guide
Sony Xperia TX LT29i Manual User Guide - Along with Li-ion battery 1750 mAh capacity installed, the Xperia TX has 127 grams weight (approximately about 4.5 ounces). The dimension size is 131 x 68.6 x 8.6 in millimeter (Height X Width X Depth). The casing cover colors of this phone are available in three choices: Black, Pink and White.
Of course the Wi-Fi, USB with microUSB v2.0, Bluetooth v3.1, Stereo FM Radio, 3G HSPA up to 42Mbps, Wi-Fi Direct, Wi-Fi Hotspot, DLNA, NFC, also ready to be used. Preoloaded Google applications such as GMail, Google Maps, Voice Search, Google Talk, Google Play are also included.
There are also many tutorial that might need to give an attention, such as how you can backup the data of you phone, how you can use the alarm clock, pairing the bluetooth, learn to connect or use the Wi-Fi, settings language and applications, download games from Google Play and many more.

Table of Contents of Sony Xperia TX LT29i User Manual
Important informationAndroid – what and whyGetting startedGetting to know your phoneCallingContactsMessagingGoogle TalkTimescapeGetting started with Google PlayPlayNow serviceVideo UnlimitedMusic UnlimitedGetting organisedScanning with the NeoReaderSynchronising dataNFCConnecting to wireless networksWeb browserListen music via Walkman Player
And for the Xperia TX LT29i User Manual, you can get it from the link below. You can also make it fast on downloading it if you have Download Manager application. Otherwise, just read it online.Identifying music using TrackIDUsing the FM radioTaking photos and recording videosView photos and videos in AlbumPlaying video clips in MoviesShare content with DLNA CertificateBluetooth wireless technologyConnecting phone to a computerConnecting phone to TV setUse Location service for positionBackup and restore applicationLock and Protect PhoneUpdating your phonePhone settingsStatus and Notification iconsApplications overviewUser supportTroubleshootingRecycling your phoneLegal informationIndex
Download Sony Xperia TX LT29i User Guide | Language: English | PDF Size: 2.28MB | Page: 151
Download Sony Xperia TX LT29i User Guide | Language: Spanish | PDF Size: 2.34MB | Page: 157
Download Sony Xperia TX LT29i User Guide | Language: German | PDF Size: 2.35MB | Page: 160
Download Sony Xperia TX LT29i User Guide | Language: Italian | PDF Size: 2.33MB | Page: 155
Sony Xperia T LT30p quick manual/user guide
Sony Xperia T LT30p quick manual/user guide - Please read the Important information leaflet before using your cell phone. Some of the services and features described in this User Guide are not supported in all countries/regions or by all networks and/or service providers in all areas. Without limitation, this applies to the GSM International Emergency Number, 112. Please contact your network operator or service provider to determine availability of any specific service or feature and whether additional access or usage fees apply.

Use of certain features and applications described in this guide may require access to the Internet. You may incur data connection charges when you connect to the Internet from your phone. Contact your wireless Service provider for more information.
Make sure the battery is charged for at least 30 minutes before you turn on the phone for the
first time.
- Press and hold down the power key
- on the right side of the phone until the
- phone vibrates.
- If your screen goes dark, briefly press the power key
- to activate the screen.
- To unlock the screen, drag
- to the right across the screen.
- Enter your SIM card PIN when requested, and select OK.
- Wait a while for the phone to start.
from the Settings menu. To correct a mistake made entering your SIM card PIN, tap .
To check the battery level
- From your Home screen, tap .
- Find and tap Settings > About phone > Status > Battery level.
The following tips can help you improve battery performance:
- Charge your phone frequently. This will not affect the lifetime of the battery.
- Downloading data from the Internet is power consuming. When you're not using the Internet, you can save power by disabling all data connections over mobile networks. This setting does not prevent your phone from transmitting data over other wireless networks.
- Turn off GPS, Bluetooth™, and Wi-Fi® when you don't need these features. You can turn them on and off more easily by adding the Quick settings widget to your Home screen. You do not need to turn off 3G.
- Use the Power Saver feature to reduce battery consumption. You can select the power saving mode that best suits the way you use your phone. You can also customize the settings of each power saving mode.
- Set your synchronization applications (used to synchronize your email, calendar and contacts) to synchronize manually. You can also synchronize automatically, but increase the synchronization intervals.
- Check the battery usage menu in the phone to see which applications use the most power. Your battery consumes more power when you use video and music streaming applications, such as YouTube™. Some applications downloaded from Google Play™ may also consume more power.
- Close and exit applications that you are not using.
- Lower the screen display brightness level.
- Turn off your phone or activate the Airplane mode setting if you are in an area with no network coverage. Otherwise, your phone repeatedly scans for available networks, and this consumes power.
- Use a Sony original handsfree device to listen to music. Handsfree devices demand less battery power than the phone's loudspeakers.
- Keep your phone in standby whenever possible. Standby time refers to the time during which the phone is connected to the network and is not being used.
- Disable any live wallpaper.
- Go to www.sonymobile.com to get the latest battery performance tips for your phone model.
Download Sony Xperia T LT30p/ LT30a User Guide | Language: English | Page: 306 | PDF Size: 10.56MB
Download Sony Xperia T LT30p User Guide | Language: English | Page: 153 | PDF Size: 2.36MB
Download Sony Xperia T LT30p User Guide | Language: Spanish | Page: 159 | PDF Size: 2.42MB
Download Sony Xperia T LT30p User Guide | Language: Germany | Page: 162 | PDF Size: 2.43MB
Download Sony Xperia T LT30p User Guide | Language: English | Page: 157 | PDF Size: 2.41MB
HTC One X+ (plus) User Manual User Guide
HTC One X+ (plus) User Manual User Guide - This is a quick tutorial on inserting the microSIM card of your mobile carrier to the SIM card slot of HTC One X+: from eject the card try, pull out the card tray, place the SIM, insert the card tray with SIM back to its slot. There is also a tutorial on how you charge the battery of the phone.

1. If the display is off, press the POWER button to turn it back on, then unlock the screen.
2. Press and hold the POWER button for a few seconds.
3. Tap Power off on the options menu.
Setting up HTC One X+ for the first time :
When you switch on HTC One X+ for the first time, you’ll be asked to set it up.
1.Walk through the on-device setup to choose your Internet connection, turn location services on or off, and more.
2. Use our HTC Get Started service to set up your accounts and personalize HTC One X+ from your computer.
The on-device setup shows you the URL of our Get Started site.
When personalizing HTC One X+, you can choose the wallpaper, sounds, apps, home screen layouts, and more. Or just choose a Quick Style that already has all these items preselected for you. You need an HTC Account to save your HTC Get Started setup and to download your settings to HTC One X+.
To find out more, see the Help and FAQ on our HTC Get Started site.
HTC One X+ (plus) Specifications
The battery uses Li-ion Polymer and its embedded inside the phone. The battery is unremovable and has 2100 mAh capacity. There is no official claim on how the duration of the battery can be used on 3G talk time network or standby. Our guess is about 6-7hours talktime, 2-3 days on standby.
Bluetooth uses version 4.0 with A2DP wireless stereo headset profile supports; Wi-Fi uses IEEE 802.11 a/b/g/n, DLAN, and Wi-Fi hotspot supports; and the USB cable uses microUSB (MHL) version 2.0. For the data networks technology this phone would be available in GSM or CDMA depend on your mobile carrier.
It’s about 135 grams weight (along with installed battery), adn about 124.36 x 69.6 x 8.9 mm dimension size (Length x Width x Thickness / Depth). For the body casing, They are two colors availale: Stealth Black and Polar White.
For the User Manual, you can download at the link below, along with HTC One X plus Quick Start Guide.
Download User Manual of HTC One X+ | Language: English | Page: 212 | PDF Size: 3.26MB
Download Quick Start Guide of HTC One X+ | Language: English | Page: 2 | PDF Size: 249KB
HTC Windows Phone 8X Manual User Guide
HTC Windows Phone 8X Manual User Guide and Operating Instruction - This HTC Windows Phone 8X user manual is available for FREE at HTC website, we merely collect the information, we neither affiliated with the author(s), the website and any brand(s) nor responsible for its content and change of content. (Read our disclaimer before you download the document from the website).

The HTC Windows Phone 8X manual or user guide has been published by HTC at their official website (htc.com). The HTC Windows Phone 8X user guide is written in PDF document format (96-pages, PDF file, 1.47 MB). For you, the owner of HTC Windows Phone 8X smartphone, can download this HTC Windows Phone 8X user manual directly to your HTC Windows Phone 8X smartphone, and read it by using PDF reader application that can be found at Windows 8 App Store. You can also download this HTC Windows Phone 8X owner manual to your desktop PC or laptop, and read it using Adobe Acrobat Reader software. The HTC Windows Phone 8X manual provides complete reference information and instructions about operating the HTC Windows Phone 8X smartphone correctly.
Performing a factory reset via settings:
1. On the Start screen, slide to the left.
2. Tap Settings> about.
3. Tap reset your phone, and then tap yes
How to set update notification and download option?
1. On the Start screen, slide to the left.
2. Tap Settings -> phone update.
3. Select the Tell me when updates are available for my phonecheck box.
4. Choose whether you want to allow automatic downloading of updates if your data settings allow it. If you disable this option, your phone will only download updates over Wi-Fi or when it’s connected to your computer
Phone not responding?
Restart your phone if it doesn’t respond when you touch the screen or press the buttons.
Press and hold the POWER button for at least 12 seconds. Your phone turns off and then turns back on.
How to set up your account?
1. On the Start screen, slide to the left.
2. Tap Settings -> email+accounts.
3. Tap add an account, and then tap the type of account you want to set up.
To know more about operating instruction and troubleshooting tips of HTC Windows Phone 8X smartphone, you can download this HTC Windows Phone 8X user manual.
Download HTC Windows Phone 8X user manual.pdf (1.47 MB)
Huawei Summit Manual User Guide
Huawei Summit Manual User Guide and Operating Instruction - To transfer all your favorite music and pictures from your PC to your mobile phone’s microSD card, set the microSD card as USB mass storage. > Connect your mobile phone to your PC with the USB cable. Your PC will detect the microSD card as a removable disk.> Open the notification bar, and then touch USB connected > Touch Turn on USB storagein the dialog box that opens to confirm that you want to transfer files and now You can transfer files from your PC to your mobile phone’s microSD card.

Connecting to a Wireless Network Huawei Summit :
- After turning on Wi-Fi, touch Apps -> Settings.
- Touch Wireless & networks -> Wi-Fi settings. You will see a list of detected Wi-Fi networks in the Wi-Fi networks section.
- Touch a Wi-Fi network to connect to it.
If you select an open network, you will be automatically connected to the network.If you select a network that is secured with Wired Equivalent Privacy (WEP) and connect to it for the first time, enter the password, and then touch Connect. If you connect to a secured wireless network that you have already used, you will not be prompted to enter the password again unless you reset your mobile phone to its default settings.On the Wi-Fi settings screen, touch Add Wi-Fi networkto add a new Wi-Fi network.
This Huawei Summit manual / user guide is available in English. For new owner of Huawei Summit mobile phone, you may need this user guide to improve your experiences while using this smartphone. This Huawei Summit user manual comes in PDF file format with 7.21 MB in size (47 pages). Improvements and changes to this Huawei Summit user manual necessitated by typographical errors, inaccuracies of current information, or improvements to programs and/or equipment, may be made by T-Mobile at any time and without notice. The information collected in this process is not associated with a specific personal identity.
To know more about complete quick operating guide of Huawei Summit, you can download this Huawei Summit user manual below.
Download T-Mobile Huawei Summit User Guide.PDF (7.21 MB)
Panasonic Toughbook SX2 Manual User Guide
Panasonic Toughbook SX2 Manual User Guide and Troubleshooting Tips - This Panasonic Toughbook SX2 user manual is available for FREE at Panasonic website, Panasonic Toughbook SX2 merely collect the information, we neither affiliated with the author(s), the website and any brand(s) nor responsible for its content and change of content. (Read our disclaimer before you download the document from the website).
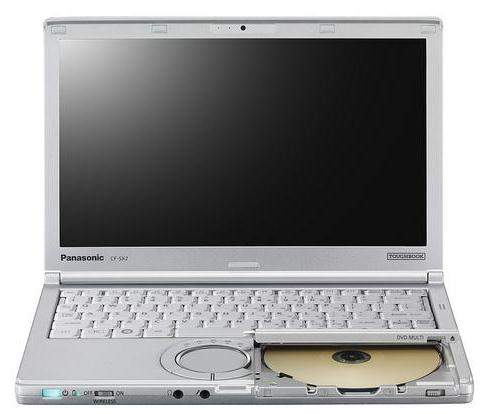
The computer does not power on / The power status indicator or battery indicator is not lit. and Solution it, Following this >Connect the AC adaptor. > Insert a fully charged battery > Remove the battery pack and the AC adaptor, then connect them again >If an additional RAM module has been inserted, remove the RAM module and check to see if the RAM module is the recommended one > When the CPU temperature is high, the computer may not start up to prevent overheat-ing of the CPU. Wait until the computer cools down, and then turn the power on again. If the computer does not power on even after cooling down, contact your technical support office > Pull out the AC cord and wait for more than 1 minute to reconnect the AC cord.
After adding or changing the RAM module, the power is turned on but nothing is dis-played on the screen. Solution: Turn off the computer and remove the RAM module, then confirm whether the RAM module has conformed to specification. When the RAM module has conformed to specification, install it again.
To know more about operating instruction and troubleshooting tips of Panasonic Toughbook SX2 laptop, you can download this Panasonic Toughbook SX2 user manual below.
Download Panasonic Toughbook SX2 User Manual.PDF (1.55 MB)
LG Freedom Manual User Guide
LG Freedom Manual User Guide and Troubleshooting Tips - This LG Freedom user manual is available for FREE at LG website, LG Freedom merely collect the information, we neither affiliated with the author(s), the website and any brand(s) nor responsible for its content and change of content. (Read our disclaimer before you download the document from the website).
Solution:
Battery installing: Remove the battery and install it to restart your phone again. (similar to how you may restart your PC/computer)
Power Reset: In the case of a malfunction or lock up error, press and hold Lock/Unlock Key for 8 seconds to reset the phone.
Troubleshooting tips of LG Freedom at a glance
Codes do not match.
When you want to change a security code you have to confirm the new code by entering it again. The two codes that you have entered do not match.
Solution:
Contact your Service Provider.
Charging error.
Solution:
Charge battery.
Check power supply and connection to the phone.
Check the battery contacts, clean them if necessary.
Plug in to a different socket or check voltage.
Test with another charger.
Only use original LG accessories.
Replace battery.

Please use our download link below to get the user manual of LG Freedom series. Inside this user manual, you can find detailed information about your LG Freedom mobile phone, operating instruction and troubleshooting tips. Use the link we provide below to start downloading the LG Freedom user manual. Then you will be redirected to our download page where you can obtain the direct access to the PDF file. Save it to your computer and open with your favorite PDF reader.
To know more about operating instruction and troubleshooting tips of LG Freedom mobile phone, you can download this LG Freedom user manual below.
Download LG Freedom User Manual.PDF (2.51 MB)
2011 Ford Fusion Owners Manual
2011 Ford Fusion Owners Manual - Largely a similar for 2011, the Ford Fusion maintains 2011 Fusion’s quality as an cost-efficient Midsize automobile with a pleasant interior, nice gasoline mileage and a organizer of functions like Incorporated Impaired Spot Showcases and HD Stations -- a replacement feature for 2011 -- that provoke customers UN agency, in keeping with Kelly felix Red Book, “need the practicality of a furnished , well-engineered and crisp-handling family-sized four-door.”
Perhaps one among the most popular inclusions in 2011 Ford Fusion is that the MyKey system. Designed for stripling people, MyKey keeps adolescents safe by proscribing their prime speed to eighty mph, proscribing radio quantity to 45 %, chiming systematically once safety devices don't seem to be secured and providing low-fuel cautions. MyKey is standard on 2011 Ford Fusion and can keep mother and father relaxed once their youngsters lend the automobile.
May be you'll pleasant during this web site, as a result of we provide what does one want? during this time, we provide you house owners manual pdf of 2011 Ford Fusion house owners Manual. Well, we predict that before you get house owners manual pdf of this automobile, we provide you the analysis of this automobile conjointly. So, we tend to advocate you to scan this initial, UN agency is aware of this info is incredibly helpful to you.

The Ford Fusion profits some a lot of upgrades for 2011 compared with its forerunner. Testers were happy with 2011 Ford Fusion’s elegant internal, a lot of extremely effective engine choices and obtainable all-wheel drive. The Ford Fusion had a superb 2010. The Fusion's rejuvenated external style and robust record of standard and optionally obtainable functions power-assisted it get a prime establish on our cost-efficient Midsize automobile position record, win 2010 Motor Pattern automobile of the Year, earn a client Reviews suggestions and become a client Guide Best purchase.
Download here 2011 Ford Fusion owners Manual.
Subscribe to:
Posts (Atom)